
How to Draw Mickey Mouse. The history of animation is full of many characters who have become famous around the world.
Also, check our Frog Coloring Pages.
Some would say that Mickey Mouse is the most recognizable cartoon character ever created, appearing in every imaginable medium.
This character has many different iterations, but he’s always instantly recognizable. Despite this, learning how to draw Mickey Mouse can still be difficult! This tutorial aims to help you with that, so read it to the end!
How to Draw Mickey Mouse
Step 1
This Mickey Mouse drawing guide will introduce her modern classic design. To do this, we’ll first draw their head and face outlines, as this is the most recognizable part of their design.
Start by drawing a small rounded oval shape for her nose. This attaches to rounded lines for the top of his snout and his smiling mouth underneath.
You can then use rounded lines at the bottom for the open mouth and draw the tongue inwards.
Next, we draw the most iconic Mickey Mouse look; his ears! His ears are rounded and almost circular and will go over his head and stick to some rounded lines.
Step 2
Now, to continue this Mickey Mouse drawing, we are going to add not only some details of the face but also the beginning of his body. First, let’s start with his eyes.
These can be drawn using some subtle oval shapes for the outlines. Next, we will add some smaller black ovals inside for her pupils.
To finish off the face, draw some rounded lines around the face to make it a separate section.
Then use some curved lines to extend her arms outwards. We’ll be adding his gloved hands shortly in a future step! Then use some rounded lines to draw the shorts she’s wearing.
These shorts wouldn’t be complete without iconic buttons, so you can style them with little ovals on the front of her pants to draw a mickey mouse.
Step 3
Mickey almost always wears his big white gloves, and we will add them in this third step of our Mickey Mouse drawing guide. Each hand has a rounded edge where the glove attaches to the arm, so you can use more curved lines to lengthen them.
Drawing the hands can be a bit tricky, so this is a step you may want to work closely with our reference image while trying to replicate what we show there. Once your hands are in place, you’re ready for step 4 of this guide to drawing mickey mouse.
Step 4
In this fourth part of your Mickey Mouse drawing, you’ll start with the legs as we move on to the final elements and details of this drawing. Draw a few slightly curved lines down from the legs of her pants to start them.
These lines have slightly rounded bases to create the shapes of her legs. To finish this part, we drew more rounded edges at the base of his legs, as shown in the reference image.
Once the legs are drawn, we proceed to the fifth step of the guide, where you will finish the final details and elements of this drawing to draw mickey mouse.
Step 5
Once you’ve added that finishing touch, you’re ready for the final step of colouring it! Now we will design his famous shoes. These will be attached to the edges at the base of the legs, as shown in the reference image.
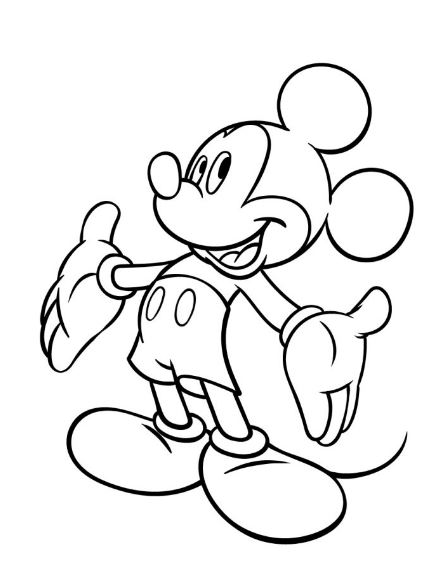
His shoes are quite large and very round, and the backs of his feet will be against each other. You can dress up her shoes by adding a curved fold line at the top.
The last element of this design is to add a thick curved line from the back of her shoe to the right for her tail lying on the floor.
Before moving on to the last step, you can add fun elements like a background or maybe other Disney characters to draw mickey mouse!
Step 6
Time to finish this Mickey Mouse drawing with some colours! In our reference image, we’ve gone with the classic colours in which Mickey Mouse is almost always seen.
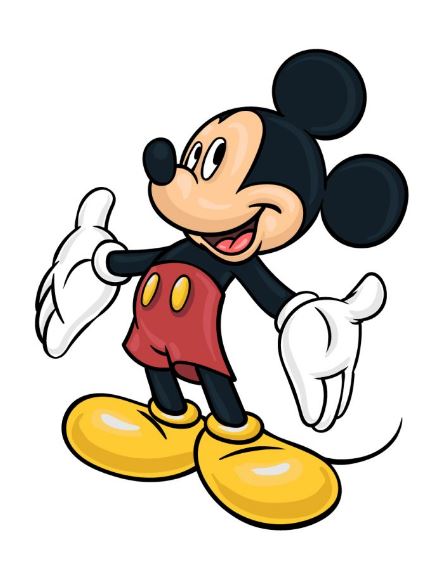
That means using a bit of beige for the face, black for the rest of the body, white for the gloves, red for the pants, and yellow for the shoes and pants buttons.
You can use this reference image to help colour, but you can also use other colours that you think would complement this image well!
Your Mickey Mouse Drawing is Finished!